Android Data Binding高级系列之整合MVVM架构

在折腾Android Data Binding库一段时间后,我决定将它应用到Model-View-ViewModel架构中。为了实验这个想法,我和@matto1990一起撸了一个应用HackerNewsReader,并使用mvvm来实现。


这篇文章将展示如何使用MVVM架构,为了帮助你更好地理解MVVM架构,我建议你看看MVVM_Hacker_News这个例子。

@hitherejoe
原文地址:https://labs.ribot.co.uk/approaching-android-with-mvvm-8ceec02d5442#.w7n6elhvj
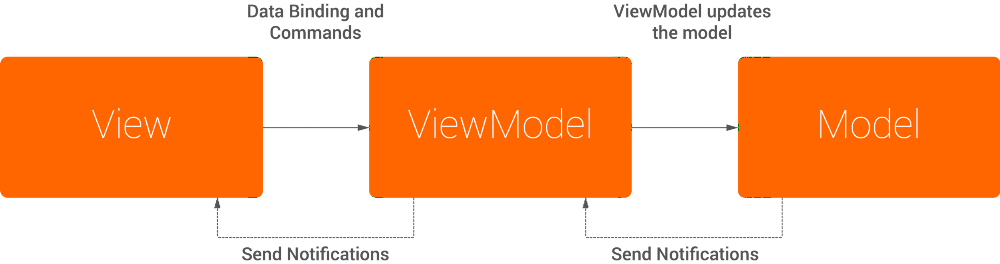
MVVM是啥?

Model-View-ViewModel是最近刚刚在安卓界流行起来的架构模式,它可以将数据模型、视图行为抽象分离,我们将UI层中的业务逻辑单独抽离出来。该架构引入了ViewModel模块,它负责暴露数据对象模型并且处理由任何逻辑引起的UI变化。

MVVM由三个核心模块组成,每一个模块都是独立的并肩负其职的:

  • Model - 数据模型,包含业务数据和验证逻辑
  • View - 屏幕所展现的UI、布局等
  • ViewModel - 在View和Model之间扮演胶水的作用,处理每一个视图逻辑(UI变化)


那么,该模式与MVC有何区别呢?MVC遵循以下特征:

  • View模块位于架构的顶端并且在它的下层就是Controller层,对底层为Model
  • Controller层能知晓ViewModel层的变化
  • View层只能知晓Model的变化,并且Model层一旦发生变化就会通知View层做出改变

其实MVVM架构模式和MVC差不多,只是有些许不同:

  • Controller被替换为ViewModel,并且也位于UI下层
  • ViewModel会把View所需要的数据以及命令对象暴露出来
  • ViewModelModel层获得数据来源

你可以看到,这两种方式使用一个类似的建构模型,而将Controller替换为ViewModel会为组件之间带来不同的通信方式。它在组件之间引入了两种不同的通信方式,而MVC只有一种。

简单的说就是MVVM是MVC的升级版,使用一个不可视组件架构在Model之上View之下,并且时刻监测和View组件相关的数据。要想真正搞懂MVVM还需要继续阅读下面几节的内容。

Hacker News reader

如文章开头所提到的,HackerNewReader是我重构旧的项目并使用MVVM架构,该应用主要具备一下特性:

  • 检索骇客新闻
  • 展示具体新闻
  • 展示新闻评论
  • 展示被选中作者发布的新闻

撸这个项目的时候是本着减少代码量的原则,因此,在阅读代码时候你会发现很容易理解它的实现原理。下图是该应用的界面预览:


MVVM has been used to implement the two screens shown here

该应用的主要部分就是左侧的新闻列表,以及新闻评论界面也是一项同的方式展示,但是也是有少许不同(接下来会讨论)

展示Posts


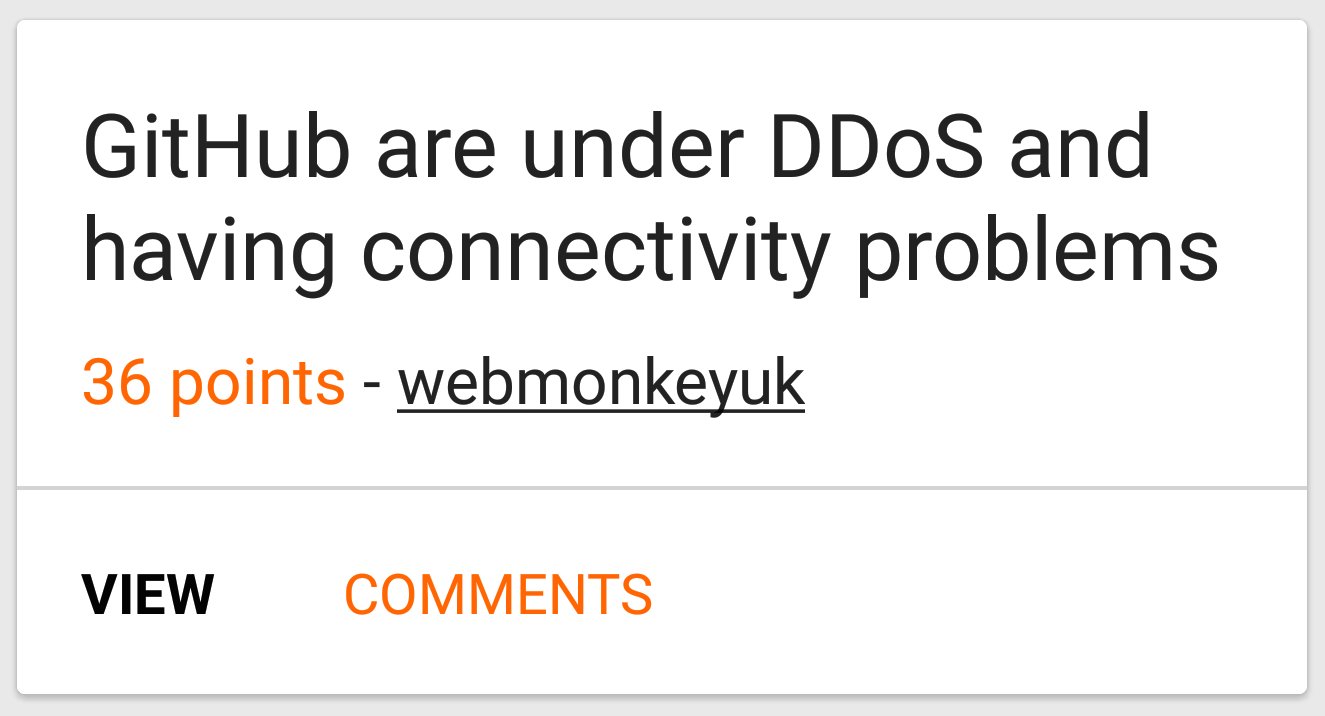
A Post is an item within a RecyclerView, displayed within a card.

每个新闻的提交都会展示在RecyclerView控件中,并且使用CardView展示每一项内容,如上图所示。

使用MVVM架构可以将Card中的内容抽象出不同的部分,也就是说被抽象出来的MVVM每一层组件只会处理该层应尽的任务。使用MVVM引入的三个模块,互相协作就可以构建一个完整新闻卡片并展示在屏幕上。所以当务之急是如何让他们相互协作呢?


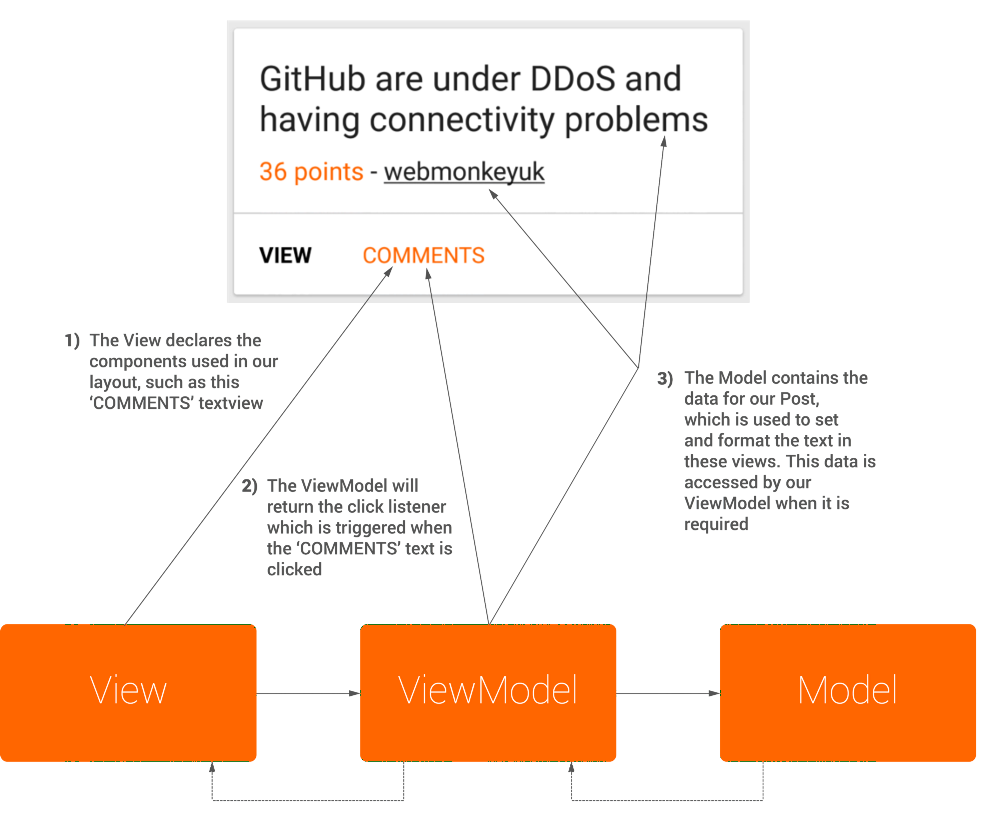
How some parts of the Post card are built in the sample app, using MVVM

Model模块

简单来说,Model模块由新闻的业务模型构成,它将包含很多模型的属性,例如id、name、text等。下面的代码是一个删减版的模型类:

1
2
3
4
5
6
7
8
9
10
11
12
13
14
15
16
17
18
19
20
21
22
23
24
25
26
27
28
29
30
31
32
33
34
35
36
37
38
39
40
public class Post {
public Long id;
public String by;
public Long time;
public ArrayList<Long> kids;
public String url;
public Long score;
public String title;
public String text;
@SerializedName("type")
public PostType postType;
public enum PostType {
@SerializedName("story")
STORY("story"),
@SerializedName("ask")
ASK("ask"),
@SerializedName("job")
JOB("job");
private String string;
PostType(String string) {
this.string = string;
}
public static PostType fromString(String string) {
if (string != null) {
for (PostType postType : PostType.values()) {
if (string.equalsIgnoreCase(postType.string)) return postType;
}
}
return null;
}
}
public Post() { }
}

这里我们可以看到Post模型仅仅包含它的属性,没有在该类下编写任何其他的逻辑。这是正确的,也是严格要求的,因为该层就是模型不允许添加其他操作,业务逻辑神马的由其他模块负责。

View模块

View模块负责构建布局、应用UI等看得见摸得着的视图层。View视图可以完全通过XML文件来完成,但是如果使用了Java代码来构建视图的话,那么该Java代码中就不允许编写和视图相关的业务逻辑代码。View模块通过使用数据绑定从ViewModel模块中检索数据。在程序运行时,ViewModel中的属性标志一旦发生变化(由业务逻辑或用户操作)就会通知监听器来设置或者更新View模块中的UI内容。

首先,我们在应用中为RecyclerView创建自定义的adapter,除此,还要创建BindingHolder来保存view实例。

1
2
3
4
5
6
7
8
public static class BindingHolder extends RecyclerView.ViewHolder {
private ItemPostBinding binding;
public BindingHolder(ItemPostBinding binding) {
super(binding.cardView);
this.binding = binding;
}
}

onBindingViewHolder()方法是处理View和ViewModel绑定的地方。我们创建一个ItemPostBinding类(其实它是由item_post.xml通过安卓数据绑定库自动生成),并且通过setViewModel方法将PostViewModel类set。这样就完成了View和ViewModel的绑定,如下代码所示:

1
2
3
ItemPostBinding postBinding = holder.binding;
postBinding.setViewModel(new PostViewModel(mContext,
mPosts.get(position), mIsUserPosts));

与传统编写view adapter的方法相比,这种方式简直是太简单了。整个PostAdapter代码如下所示:

1
2
3
4
5
6
7
8
9
10
11
12
13
14
15
16
17
18
19
20
21
22
23
24
25
26
27
28
29
30
31
32
33
34
35
36
37
38
39
40
41
42
43
44
45
46
47
48
49
50
51
52
public class PostAdapter extends RecyclerView.Adapter<PostAdapter.BindingHolder> {
private List<Post> mPosts;
private Context mContext;
private boolean mIsUserPosts;
public PostAdapter(Context context, boolean isUserPosts) {
mContext = context;
mIsUserPosts = isUserPosts;
mPosts = new ArrayList<>();
}
@Override
public BindingHolder onCreateViewHolder(ViewGroup parent, int viewType) {
ItemPostBinding postBinding = DataBindingUtil.inflate(
LayoutInflater.from(parent.getContext()),
R.layout.item_post,
parent,
false);
return new BindingHolder(postBinding);
}
@Override
public void onBindViewHolder(BindingHolder holder, int position) {
ItemPostBinding postBinding = holder.binding;
postBinding.setViewModel(new PostViewModel(mContext, mPosts.get(position), mIsUserPosts));
}
@Override
public int getItemCount() {
return mPosts.size();
}
public void setItems(List<Post> posts) {
mPosts = posts;
notifyDataSetChanged();
}
public void addItem(Post post) {
mPosts.add(post);
notifyDataSetChanged();
}
public static class BindingHolder extends RecyclerView.ViewHolder {
private ItemPostBinding binding;
public BindingHolder(ItemPostBinding binding) {
super(binding.cardView);
this.binding = binding;
}
}
}

我们将视线回到XML布局文件上,这里为了实现数据绑定库,我们要在布局文件的最外出使用layout标签来包裹整个文件,并且为ViewModel声明data标签,如下所示:

1
2
3
4
5
6
7
8
9
10
<layout xmlns:android="http://schemas.android.com/apk/res/android">
<data>
<variable
name="viewModel"
type="com.hitherejoe.mvvm_hackernews.viewModel.PostViewModel" />
</data>
<!-- Other layout views -->
</layout>

声明了viewModel变量就意味着我们可以在当前布局文件中使用ViewModel类了。我在item_post.xml中很多地方都使用了ViewModel类,真的是很方便。

  • androidText - 很有可能在ViewModel中使用相关等方法或者引用来为文本视图的控件设置文本内容。你可以看到下面代码使用了@{viewModel.postTitle},该引用会调用ViewModel中的getPostTitle()方法,并且返回我们想要的新闻标题,然后直接设置到文本视图上。
  • onClick - 我们也可以直接在xml文件中引用onClick监听器执行点击操作。下面代码中用到了@{viewModel.onClickPost},它是ViewModel中onClickPost()方法的引用,该方法将返回一个携带点击事件的监听器并且直接赋给控件。
  • visibility - 当我们要打开一个新闻评论界面的时候,要看当前新闻时候有评论,它的实现原理就是检查comments模型list的size,如果为零就会设置不可见状态否则设为可见。这些逻辑也是在ViewModel模块中完成的。我们使用getCommentsVisiblity()方法并且返回是否可见。
1
2
3
4
5
6
7
8
9
10
11
12
13
14
15
16
17
18
19
20
21
22
23
24
25
26
27
28
29
30
31
32
33
34
35
36
37
38
39
40
41
42
43
44
45
46
47
48
49
50
51
52
53
54
55
56
57
58
59
60
61
62
63
64
65
66
67
68
69
70
71
72
73
74
75
76
77
78
79
80
81
82
83
84
85
86
87
88
89
90
91
92
93
94
95
96
97
98
99
100
101
102
103
104
105
106
107
108
109
110
111
112
113
114
<?xml version="1.0" encoding="utf-8"?>
<layout xmlns:android="http://schemas.android.com/apk/res/android">
<data>
<variable name="viewModel" type="com.hitherejoe.mvvm_hackernews.viewModel.PostViewModel" />
</data>
<android.support.v7.widget.CardView
xmlns:card_view="http://schemas.android.com/apk/res-auto"
android:id="@+id/card_view"
android:layout_width="match_parent"
android:layout_height="wrap_content"
android:layout_marginTop="2dp"
android:layout_marginBottom="2dp"
card_view:cardCornerRadius="2dp"
card_view:cardUseCompatPadding="true">
<LinearLayout
android:id="@+id/container_post"
android:layout_width="match_parent"
android:layout_height="wrap_content"
android:clickable="true"
android:orientation="vertical"
android:onClick="@{viewModel.onClickPost}">
<LinearLayout
android:layout_width="match_parent"
android:layout_height="wrap_content"
android:orientation="vertical"
android:padding="16dp"
android:background="@drawable/touchable_background_white">
<TextView
android:id="@+id/text_post_title"
android:layout_width="match_parent"
android:layout_height="wrap_content"
android:layout_marginBottom="8dp"
android:text="@{viewModel.postTitle}"
android:textColor="@color/black_87pc"
android:textSize="@dimen/text_large_title"
android:onClick="@{viewModel.onClickPost}"/>
<RelativeLayout
android:layout_width="match_parent"
android:layout_height="wrap_content">
<TextView
android:id="@+id/text_post_points"
android:layout_width="wrap_content"
android:layout_height="wrap_content"
android:layout_alignParentLeft="true"
android:text="@{viewModel.postScore}"
android:textSize="@dimen/text_body"
android:textColor="@color/hn_orange" />
<TextView
android:id="@+id/text_post_author"
android:layout_width="wrap_content"
android:layout_height="wrap_content"
android:layout_toRightOf="@+id/text_post_points"
android:text="@{viewModel.postAuthor}"
android:textColor="@color/black_87pc"
android:textSize="@dimen/text_body"
android:bufferType="spannable"
android:onClick="@{viewModel.onClickAuthor}"/>
</RelativeLayout>
</LinearLayout>
<View
android:layout_width="match_parent"
android:layout_height="1dp"
android:background="@color/light_grey" />
<LinearLayout
android:layout_width="match_parent"
android:layout_height="wrap_content"
android:orientation="horizontal"
android:background="@color/white">
<TextView
android:id="@+id/text_view_post"
android:layout_width="wrap_content"
android:layout_height="wrap_content"
android:padding="16dp"
android:background="@drawable/touchable_background_white"
android:clickable="true"
android:textColor="@color/black"
android:textSize="@dimen/text_small_body"
android:textStyle="bold"
android:text="@string/view_button"
android:onClick="@{viewModel.onClickPost}"/>
<TextView
android:id="@+id/text_view_comments"
android:layout_width="wrap_content"
android:layout_height="wrap_content"
android:padding="16dp"
android:background="@drawable/touchable_background_white"
android:clickable="true"
android:textColor="@color/hn_orange"
android:textSize="@dimen/text_small_body"
android:text="@string/comments_button"
android:onClick="@{viewModel.onClickComments}"
android:visibility="@{viewModel.commentsVisibility}"/>
</LinearLayout>
</LinearLayout>
</android.support.v7.widget.CardView>
</layout>

写这样的代码是不是很爽呢?它允许我们把布局中要展示的逻辑从布局中抽象分离出来,并且写到ViewModel层,我们只需关心该层就可以了。

ViewModel模块

ViewModel模块在View与Model之间充当联系人的角色,它负责通知View层的视图变化的逻辑,还肩负着访问Model层数据的职责。访问数据的作用是通知View层的更新。在ViewModel层要严格按照上述的职责进行编码,不允许在其他层出现更新视图的逻辑以及其他层直接访问Model数据。

在我们的项目中PostViewModel类使用了Post对象来操作CardView的内容变化。在下面列出的代码中你会看到所有的被绑定的方法或者字段每个被绑定的方法或者字段都和布局文件中的控件相关联。

  • getPostTitle() - 用于获取新闻标题的方法。
  • getPostAuthor() - 该方法首先在资源文件中检索字符串,并且通过Post模型中的Author属性进行格式化。当isUserPosts为true就为文本添加下划线,最后返回字符串内容。
  • getCommentsVisibility() - 该方法返回Comments视图的可见性。
  • onClickPost() - 为与该方法关联的视图控件返回点击事件监听器。

该例子展示了当前ViewModel中各种操作视图逻辑的方法。下面是PostViewModel类完整代码:

1
2
3
4
5
6
7
8
9
10
11
12
13
14
15
16
17
18
19
20
21
22
23
24
25
26
27
28
29
30
31
32
33
34
35
36
37
38
39
40
41
42
43
44
45
46
47
48
49
50
51
52
53
54
55
56
57
58
59
60
61
62
63
64
65
66
67
68
69
70
71
72
public class PostViewModel extends BaseObservable {
private Context context;
private Post post;
private Boolean isUserPosts;
public PostViewModel(Context context, Post post, boolean isUserPosts) {
this.context = context;
this.post = post;
this.isUserPosts = isUserPosts;
}
public String getPostScore() {
return String.valueOf(post.score) + context.getString(R.string.story_points);
}
public String getPostTitle() {
return post.title;
}
public Spannable getPostAuthor() {
String author = context.getString(R.string.text_post_author, post.by);
SpannableString content = new SpannableString(author);
int index = author.indexOf(post.by);
if (!isUserPosts) content.setSpan(new UnderlineSpan(), index, post.by.length() + index, 0);
return content;
}
public int getCommentsVisibility() {
return post.postType == Post.PostType.STORY && post.kids == null ? View.GONE : View.VISIBLE;
}
public View.OnClickListener onClickPost() {
return new View.OnClickListener() {
@Override
public void onClick(View v) {
Post.PostType postType = post.postType;
if (postType == Post.PostType.JOB || postType == Post.PostType.STORY) {
launchStoryActivity();
} else if (postType == Post.PostType.ASK) {
launchCommentsActivity();
}
}
};
}
public View.OnClickListener onClickAuthor() {
return new View.OnClickListener() {
@Override
public void onClick(View v) {
context.startActivity(UserActivity.getStartIntent(context, post.by));
}
};
}
public View.OnClickListener onClickComments() {
return new View.OnClickListener() {
@Override
public void onClick(View v) {
launchCommentsActivity();
}
};
}
private void launchStoryActivity() {
context.startActivity(ViewStoryActivity.getStartIntent(context, post));
}
private void launchCommentsActivity() {
context.startActivity(CommentsActivity.getStartIntent(context, post));
}
}

很不错,不是吗?如你所看到的,ViewModel会关心如下几件事。

  • 提供Post模型属性,并且将他们展示到View层
  • 为模型中的属性提供格式化操作并且输出给View层
  • 在布局中为onClick属性关联并且提供点击事件操作的监听器
  • 基于模型属性操作视图可见性

测试ViewModel模块

使用MVVM架构还有一个好处就是对ViewModel模块进行单元测试是非常方便简单的。对于PostViewModel类来说,可以创建一个非常简单的测试类来测试ViewModel中的方法是否实现正确。

  • shouldGetPostScore() - 测试getPostScore()方法,保证新闻评分以正确格式的字符串被返回
  • shouldGetPostTitle() - 测试getPostTitle()方法保证新闻标题被正确返回
  • shouldGetPostAuthor() - 测试getPostAuthor()方法,保证作者姓名以正确格式的字符串被返回
  • shouldGetCommentsVisiblity() - 测试getCommentsVisiblity()方法,是否为CardView上的comments按钮提供正确的可见性。我们传入不同状态下的ArrayList来保证为每个用例返回的可见性是否正确
1
2
3
4
5
6
7
8
9
10
11
12
13
14
15
16
17
18
19
20
21
22
23
24
25
26
27
28
29
30
31
32
33
34
35
36
37
38
39
40
41
42
43
44
@RunWith(RobolectricTestRunner.class)
@Config(constants = BuildConfig.class, sdk = DefaultConfig.EMULATE_SDK, manifest = DefaultConfig.MANIFEST)
public class PostViewModelTest {
private Context mContext;
private PostViewModel mPostViewModel;
private Post mPost;
@Before
public void setUp() {
mContext = RuntimeEnvironment.application;
mPost = MockModelsUtil.createMockStory();
mPostViewModel = new PostViewModel(mContext, mPost, false);
}
@Test
public void shouldGetPostScore() throws Exception {
String postScore = mPost.score + mContext.getResources().getString(R.string.story_points);
assertEquals(mPostViewModel.getPostScore(), postScore);
}
@Test
public void shouldGetPostTitle() throws Exception {
assertEquals(mPostViewModel.getPostTitle(), mPost.title);
}
@Test
public void shouldGetPostAuthor() throws Exception {
String author = mContext.getString(R.string.text_post_author, mPost.by);
assertEquals(mPostViewModel.getPostAuthor().toString(), author);
}
@Test
public void shouldGetCommentsVisibility() throws Exception {
// Our mock post is of the type story, so this should return gone
mPost.kids = null;
assertEquals(mPostViewModel.getCommentsVisibility(), View.GONE);
mPost.kids = new ArrayList<>();
assertEquals(mPostViewModel.getCommentsVisibility(), View.VISIBLE);
mPost.kids = null;
mPost.postType = Post.PostType.ASK;
assertEquals(mPostViewModel.getCommentsVisibility(), View.VISIBLE);
}
}

到现在为止,我们已经知道ViewModel使可以保证正常工作的。

Comments功能

评论功能模块的实现方法和Post模型非常接近,但是有一点不同时需要指明的。

comments应用了两种不同的view模型,一个是CommentHeaderViewModel另外一个是CommentViewModel。如果你看到CommentAdapter的代码你就会注意到他俩是两种不同类型的视图,如下:

1
2
private static final int VIEW_TYPE_COMMENT = 0;
private static final int VIEW_TYPE_HEADER = 1;

如果Post类型是一个Ask post,那么你就可以在屏幕顶部使用header部分来展示我们要问的问题,底下的评论也照常显示出来。你会在onCreateViewHolder()方法里注意到我们根据VIEW_TYPE来inflate不同的视图,相应的该方法也会返回不同VIEW_TYPE的视图。

1
2
3
4
5
6
7
8
9
10
11
12
13
14
15
16
17
if (viewType == VIEW_TYPE_HEADER) {
ItemCommentsHeaderBinding commentsHeaderBinding =
DataBindingUtil.inflate(
LayoutInflater.from(parent.getContext()),
R.layout.item_comments_header,
parent,
false);
return new BindingHolder(commentsHeaderBinding);
} else {
ItemCommentBinding commentBinding =
DataBindingUtil.inflate(
LayoutInflater.from(parent.getContext()),
R.layout.item_comment,
parent,
false);
return new BindingHolder(commentBinding);
}

接下来,在onBindViewHolder()方法中,我们根据view类型来绑定相应的viewholder。这也正因为我们使用了不同ViewModel的情况下可以相继应用到不同view类型中。

1
2
3
4
5
6
7
8
9
10
11
12
13
14
if (getItemViewType(position) == VIEW_TYPE_HEADER) {
ItemCommentsHeaderBinding commentsHeaderBinding =
(ItemCommentsHeaderBinding) holder.binding;
commentsHeaderBinding.setViewModel(new
CommentHeaderViewModel(mContext, mPost));
} else {
int actualPosition = (postHasText()) ? position - 1 : position;
ItemCommentBinding commentsBinding =
(ItemCommentBinding) holder.binding;
mComments.get(actualPosition).isTopLevelComment =
actualPosition == 0;
commentsBinding.setViewModel(new CommentViewModel(
mContext, mComments.get(actualPosition)));
}

以上就是和Post模型不同的地方,评论部分使用了两个ViewModel,选择哪个ViewModel使用要根据当前Post是不是Ask类型

总结

如果你熟练掌握了安卓数据绑定库,你将会改变传统安卓编码方式,并且根”本停不下来”。当然你可以在其他情形下使用Android Data Binding,在MVVM架构下使用它只是其中一种方式而已。

例如我们只是在布局中引用模型数据,通过直接访问模型的属性作为布局中的全局变量来使用。

1
2
3
4
5
6
<data>
<variable name="post" type="your.package.name.model.Post"/>
</data>
<TextView
...
android:text="@{post.title}"/>

这样做真的是很简单,也能帮你减少很多样板代码的使用。虽然它很好用,但是也要注意一些问题,例如:

1
2
3
4
5
6
7
<data>
<import type="android.view.View"/>
</data>
<TextView
...
android:visibility="@{post.hasComments ? View.Visible :
View.Gone}"/>


Me upon seeing the above.

这种情况下可能会对使用产生负面的影响。这里相当于把视图逻辑操作放在了View层了。这种方式不仅在代码上看着凌乱,而且使得单元测试以及debugging调试变得很困难。

现阶段认为用MVVM架构开发Android应用还没有流行起来,然而这次撸这个项目使我有机会接触到可能是未来最佳的的时间方式,还是很欣慰的。接下来我还想更深入的研究该架构模式。如果你不了解安卓数据绑定库,你可以查阅谷歌官方文档。微软公司是最早提出MVVM架构模式的,他们也为此编写了一些文档提供开发者查阅。